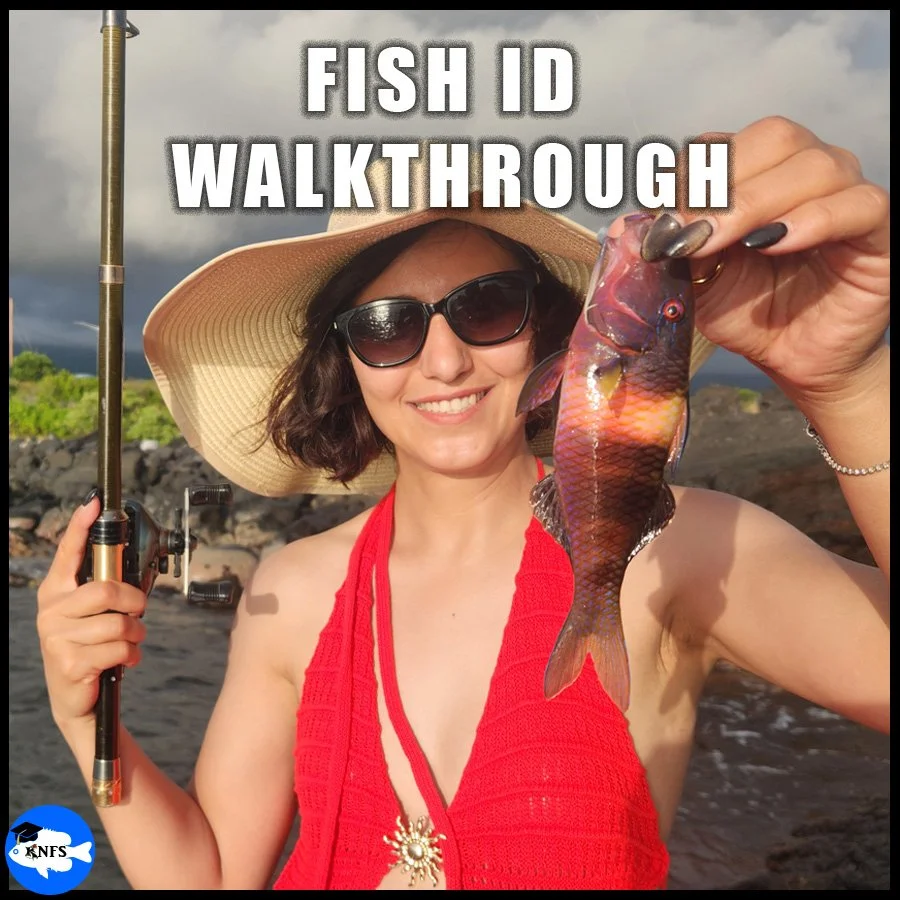
We’ll do a walkthrough of how to identify this fish down below.
On this page:
Fish ID Resources Overview
Key Points of Fish ID
Walkthrough with a Free Fish ID Resource
Knowing what species of fish is on the end of the line is very rewarding. Also knowing that species of fish allows an angler to further make decisions that will abide by regulations as well as enact choices on what to do with that fish after capture. Hence the importance of knowing what fishes you could possibly catch before you go fishing, at least to some extent.
As of 2026, there are over 37,000 species of living fishes in the world—that’s a lot! I will give you some free tools to utilize in your fish identification journey—but at the end of the day, fish identification requires some effort, often an enjoyable pursuit.
Later on this page, we’ll do a fish identification walkthrough using free online resources.
Resources Overview:
Affiliate link to external source.
There are many ways to teach fish identification. In some cases, such as for very small species, fish identification requires genetic testing, killing the fish, and/or using a microscope. Most anglers do not need to go as far as scientists do in this regard.
For the purposes of this identification tutorial, we are going to keep it simple because most gamefishes do not require intensive identification methods.
I highly recommend an angler purchase a fish identification book for the region/locality of interest.
Considering that our fishing guide focuses on North American fishing, specifically within the United States, my recommended guide for freshwater species is as follows:
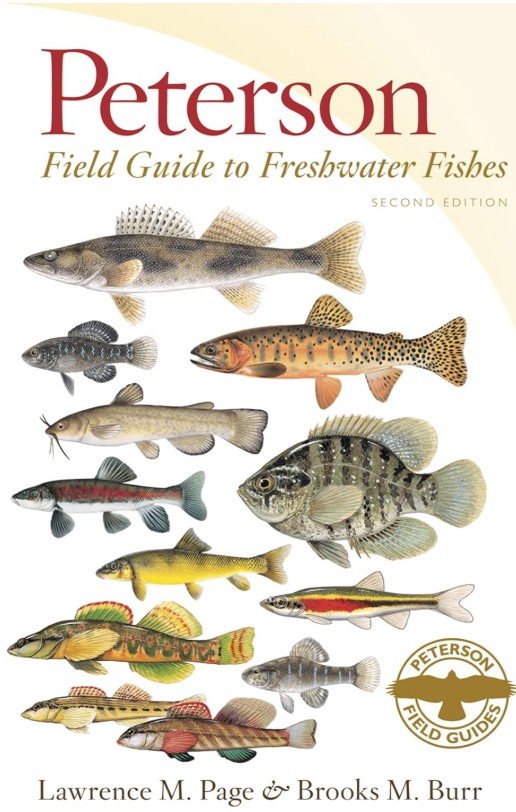
The Peterson Field Guide to Freshwater Fishes remains an ID book that I still use to this day. Although, the content is slightly outdated as over the years the science community has renamed or removed some species and there have been new additions of species; however, the content remains full of quality information and well-illustrated fishes for under $20. Regional ID books and waterproof pamphlets are also excellent reference sources.
3 Ways to Get Started with Fish ID:
(FREE RESOURCE) - Familiarize yourself with the state’s fishing regulations found online (and usually available as a big downloadable .pdf file). There will be images of the most commonly encountered gamefishes for that state in that file and/or within supplementary information on the government website.
(FREE RESOURCE) - Familiarize yourself with iNaturalist and how to examine fishes in an area. (We’ll do a walkthrough with this.)
Buy a field guide on fishes whether it is a three-page pamphlet of local reef fishes or a more complete book of regional fishes like in the adjacent image.
KEY POINTS
KEY POINT #1 - Where was the fish caught?
Water System - Knowing the county and actual system (such as the name of the lake, drainage, or river) of where you caught a fish will greatly help you identify that fish when you reference the range maps (or distribution maps) of a species. For example, the big genus (or group) of black basses recently split to add even more species! It’s fairly simple to know if you have caught a black bass or not, what is trickier is narrowing it down to the exact species. Knowing exactly what water system you caught a fish from will help with an ID while you reference your guide materials.
Click to enlarge.
Water Type - There are species of fishes that live exclusively in freshwater or exclusively in saltwater, there are some that live in both, and there are some fishes that can tolerate moderately salty water and live in what’s called brackish water. Knowing this simple information may very well make sure you are not looking for an identification of a freshwater fish in the saltwater fish section of a guidebook.
KEY POINT #2 - What is the life stage of the fish?
Click to enlarge. - Notice that the very dark lateral stripe on the juvenile does not exist on the adult specimen even though they are the same species.
Understanding if a fish may be a juvenile, sub-adult, or adult may be very helpful in determining an ID. Why is that important?
Many species of fishes go through drastic changes in appearance from their larval stage all the way to their adult stage.
For example, chubsuckers, as juveniles, have a very dark, noticeable stripe that runs all along their body, even onto the tip of the lips; (see adjacent image.) As adults, this stripe may be absent, broken, or faded. As another example, Channel Catfish, as juveniles have spotting along a pale body. As this species matures into adulthood the spots disappear and the body becomes much darker.
Keep in mind that the photos in your guidebook may only be showing adult specimens and you may have actually caught a juvenile!
The free online tool we’ll mention later in this section, iNaturalist, is helpful because images of various life stages will most likely appear for the species you are browsing. Also, reading the textual information of the fish’s description of a guidebook is helpful to see if color and patterning differences exist between life stages.
Sexual dimorphism also exists in many species of fishes. This is when males and females have very different appearances.
KEY POINT #3 - What are the most obvious features on the fish?
Two common body types of two very different groups of fishes. FISH #1 on the left is a Great White Shark. FISH #2 on the right is a type of catfish called a Black Bullhead.
Even if you can’t confidently name a single fish right now, you’re already somewhat familiar with fish diversity because you’ve been exposed to it in various forms of media your whole life.
I bet if I showed you only a silhouette image of a shark and then only a silhouette image of a catfish you would readily know which is which; (see adjacent image.)
But how are you doing that? Well, your mind is already familiar with recognizing some distinguishing features that separate those two types of fish groups. The silhouette shark has that strong-looking, fusiform body with an erect dorsal fin and a tail with lobes that are seen on many sharks. The silhouette of the catfish has the barbels, or whisker-like extensions, hanging from the mouth with fins that look floppy.
That’s really the core of fish identification—find easily apparent features on a fish that make it different from other fishes. These features may be shapes of body sections, colorations, patterns, number of fins, fin locations, and more.
ID WALKTHROUGH

iNaturalist is a freed-to-access citizen scientist database.
I find that most of my students learn best when seeing a walkthrough, or the steps I actually take when identifying a fish. We’ll be using only freely accessible, online resources because I don’t want new anglers to feel obligated to buy a guidebook. Though, an angler with a field guide of local fishes will be better equipped.
We’ll use iNaturalist:
About iNaturalist: This free-to-access database is full of observations of fishes all over the world.
Using iNaturalist.org is the most simple, practical way I can quickly get you started learning how to ID fish.
This citizen-scientist website platform is free and readily available to anyone with a way of accessing a webpage and/or app on their smartphone. I’m assuming that if you’re accessing this free content on koaw.org then you’ll be able to access iNaturalist content.
As of the time of writing this guide, you don’t even need an account to access iNaturalist content; however, creating a free account with iNaturalist will enable you to upload photos of your fish where other citizen scientists (and often other actual scientists) may offer identifications on the photos you upload. Be reminded that the quality of your photos will correlate with the quality of offered identifications from the iNat community—identifying a fish from is very difficult, if not impossible, from a blurry photo and/or a photo showing only a portion of a fish.
Realistically, I don’t expect you to master fish identification from what I’m presenting, nor should you expect that either. At our university we teach entire fish identification courses; many students struggle even when they have access to experienced educators, quality books, and preserved specimens to analyze in the lab.
So don’t be hard on yourself if you don’t feel like you’re picking it up quickly.
Fish diversity is tremendous and complicated.
STEP 1 - Learn local species before fishing:
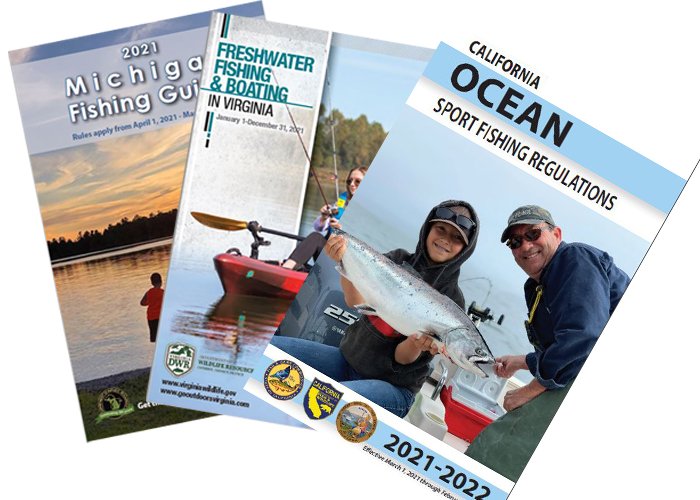
The state fishing regulations booklet will have informative illustrations of the most commonly encountered gamefishes and possibly other encountered species.
As was mentioned at the top of this page, knowing what fishes you could potentially catch in an area ahead of time is important. You don’t need to memorize them—
but you should first and foremost be aware of what is illegal to try and catch.
Often this is mentioned in the main regulations-booklet offered by the state (a downloadable .pdf). Search for words like “regulated species”, “off-limits”, “no season”, “never allowed”, “unlawful”, to find these fishes in the regulations.
After knowing what you can’t target, you can try and catch anything else while using legal methods in legal areas. And as long as you don’t plan on harvesting (or keeping) a caught fish, you can grab a photo and put the fish back in the water. You may not have known what species you caught but you’ll be able to identify the fish later.
Even if you accidentally catch a fish that is illegal to target, just treat that fish with respect like your other catches and put the fish back in the water.
If you do plan on keeping a fish, then you better know exactly what species that fish is to make sure you are in accordance with regulations.
Asi standing on rocks casting into the ocean. (Note: This is not a great spot to start for novice anglers!)
Walkthrough Time with iNaturalist:
For our walkthrough, we’ll go to Hawaii as I recently returned from the ‘Big Island’ with my one of my best fishing partners, Asi. Although we weren’t in Hawaii on a fishing trip, we still snuck away one day to do some fishing. That was my first time in Hawaii. I was not too familiar with many local fishes.
The steps I’m about to cover are essentially the exact same steps that can be used for any other state, just with mild changes on where to click and find information.
STEP 1 CONTINUED:
Before Asi and I went fishing:
Part A - Steps 1 - 4. Click to enlarge.
A. I read the rules and regulations set forth by Hawaii. This information was found on their governmental website.
Look for the term “regulations” in the official government site for fishing management.
I first typed “Hawaii fishing license” into a Google search engine. Typiing “Hawaii fishing regulations” works as well. This is how I found the official state website.
I clicked on the .gov website link that had the “dlnr” in the url link (dlnr.hawaii.gov); I know that means “Department of Land and Natural Resources”. And .gov links are trustworthy, almost always. The other .gov link that popped up was also trustworthy but would have taken more clicks to find the regulations.
In the “dlnr.hawaii.gov” site, I clicked on “Fishing” that then required a click on “Regulations”
I found a link to download the most current “fishing regulations.”
B. From those rules and regulations,
I learned what species are regulated in Hawaii, as in, what fishes have specific rules that an angler must abide by.
I learned what areas had special restrictions by clicking on “Regulated Areas.”
I learned what a recreational angler was allowed to target and not allowed to target. Of the fishes, sharks and rays are fishes that no one is allowed to fish for in Hawaii at any time for any reason.
C. Browsing the other offered materials on their website I found a few other references for matching scientific names with the local common names. This was very helpful because the local common names of these fishes in Hawaii are derived from the native language and were very unfamiliar to me.
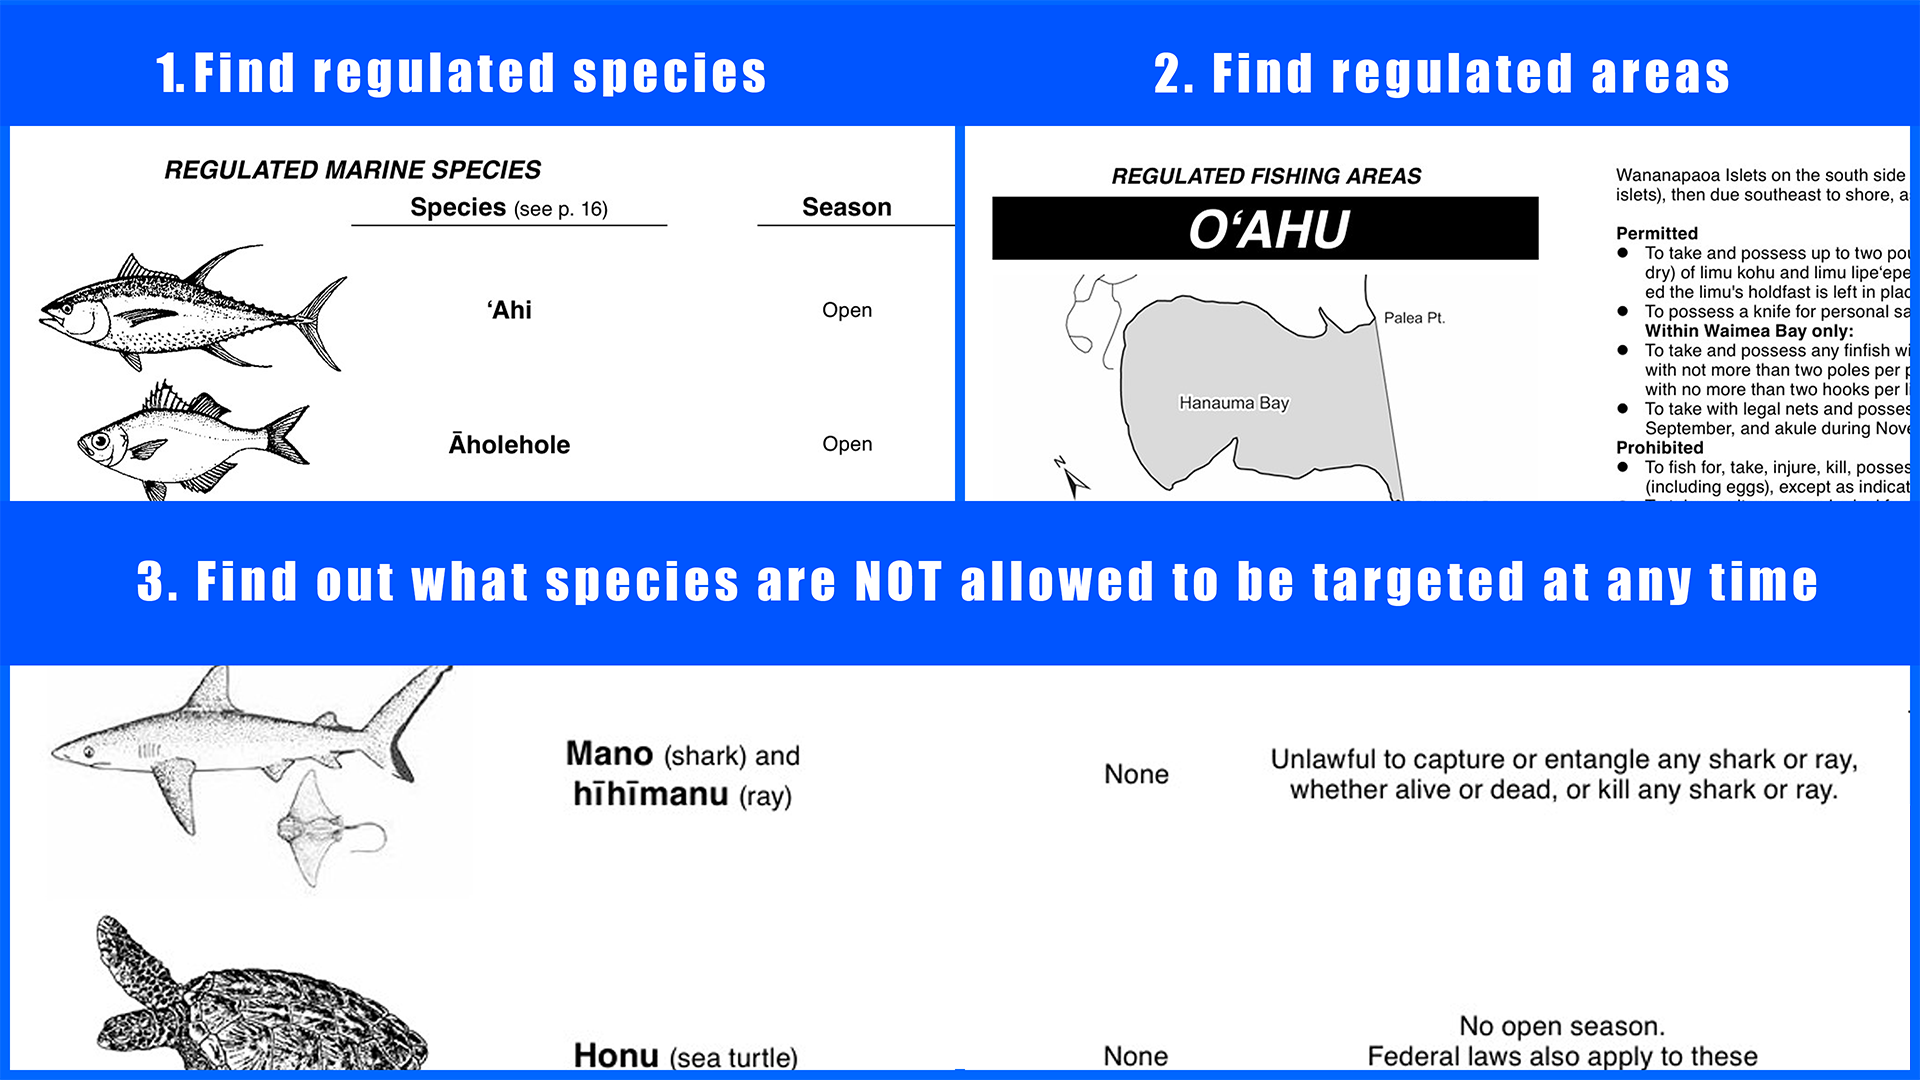
Part B Steps 1 -3; Part C
D. Since I wasn’t planning on harvesting and/or keeping any fish, I didn’t concern myself with size limits. I also bought my one-day non-resident license.
Every state has a different website format. The trick just involves using some common sense to find your way through the (sometimes poorly constructed) website to find the regulation book. As anglers, one of our best features is that we are adaptable to many situations. So, just adapt your searching methods!
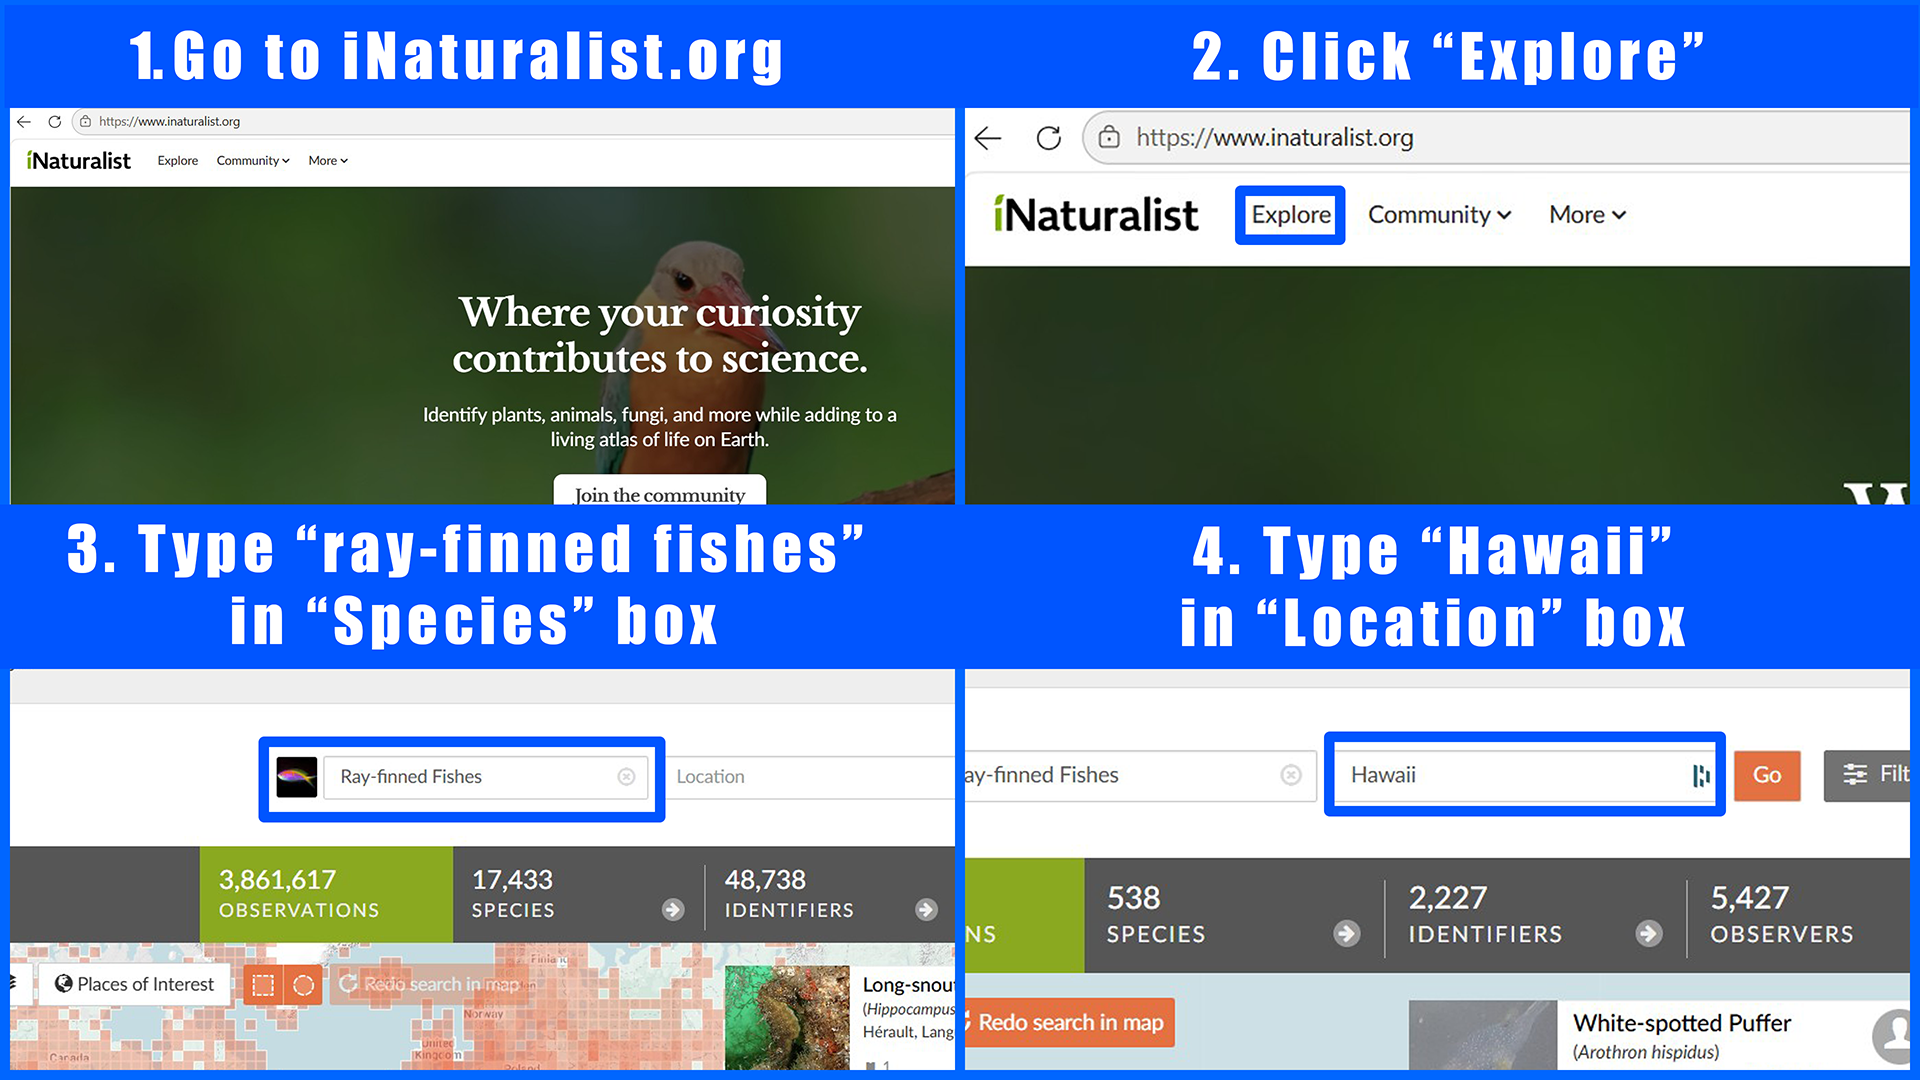
Part E - Steps 1 - 4.
E. Finally, I browsed iNaturalist to do a broad search of ray-finned fishes to see what species I was most likely to encounter if I was planning on fishing from shore with small rigs.
By going to iNaturalist.org
and clicking on “Explore”
and typing “ray-finned fishes” or “actinopterygii” into the input box that reads “Species”
and typing “Hawaii” into the input box that reads “Location”
and then clicking “Go” (if it doesn’t automatically load,) lots of data with images and associated observations of fishes will appear. There are 538 different species of fishes found around and in Hawaii.
Under the “MAP” portion, I navigated around the map using the “+” and “-” icon as well as clicking and dragging on the map.
After zooming in and locating over the western beaches of the Big Island, I clicked “Redo search in map” to narrow the data to that smaller region.
Clicking on “SPECIES” next to “OBSERVATIONS” will show the most commonly encountered species in that region.
I did the same steps as above, except to browse the other class of fishes that might show up. Instead of typing “ray-finned fishes”, I also searched for “cartilaginous fishes” to see sharks and rays. Of course, these fishes are off limits to anglers. There are other classes of fishes, such as the hagfishes and lampreys, but they are not found in this region.
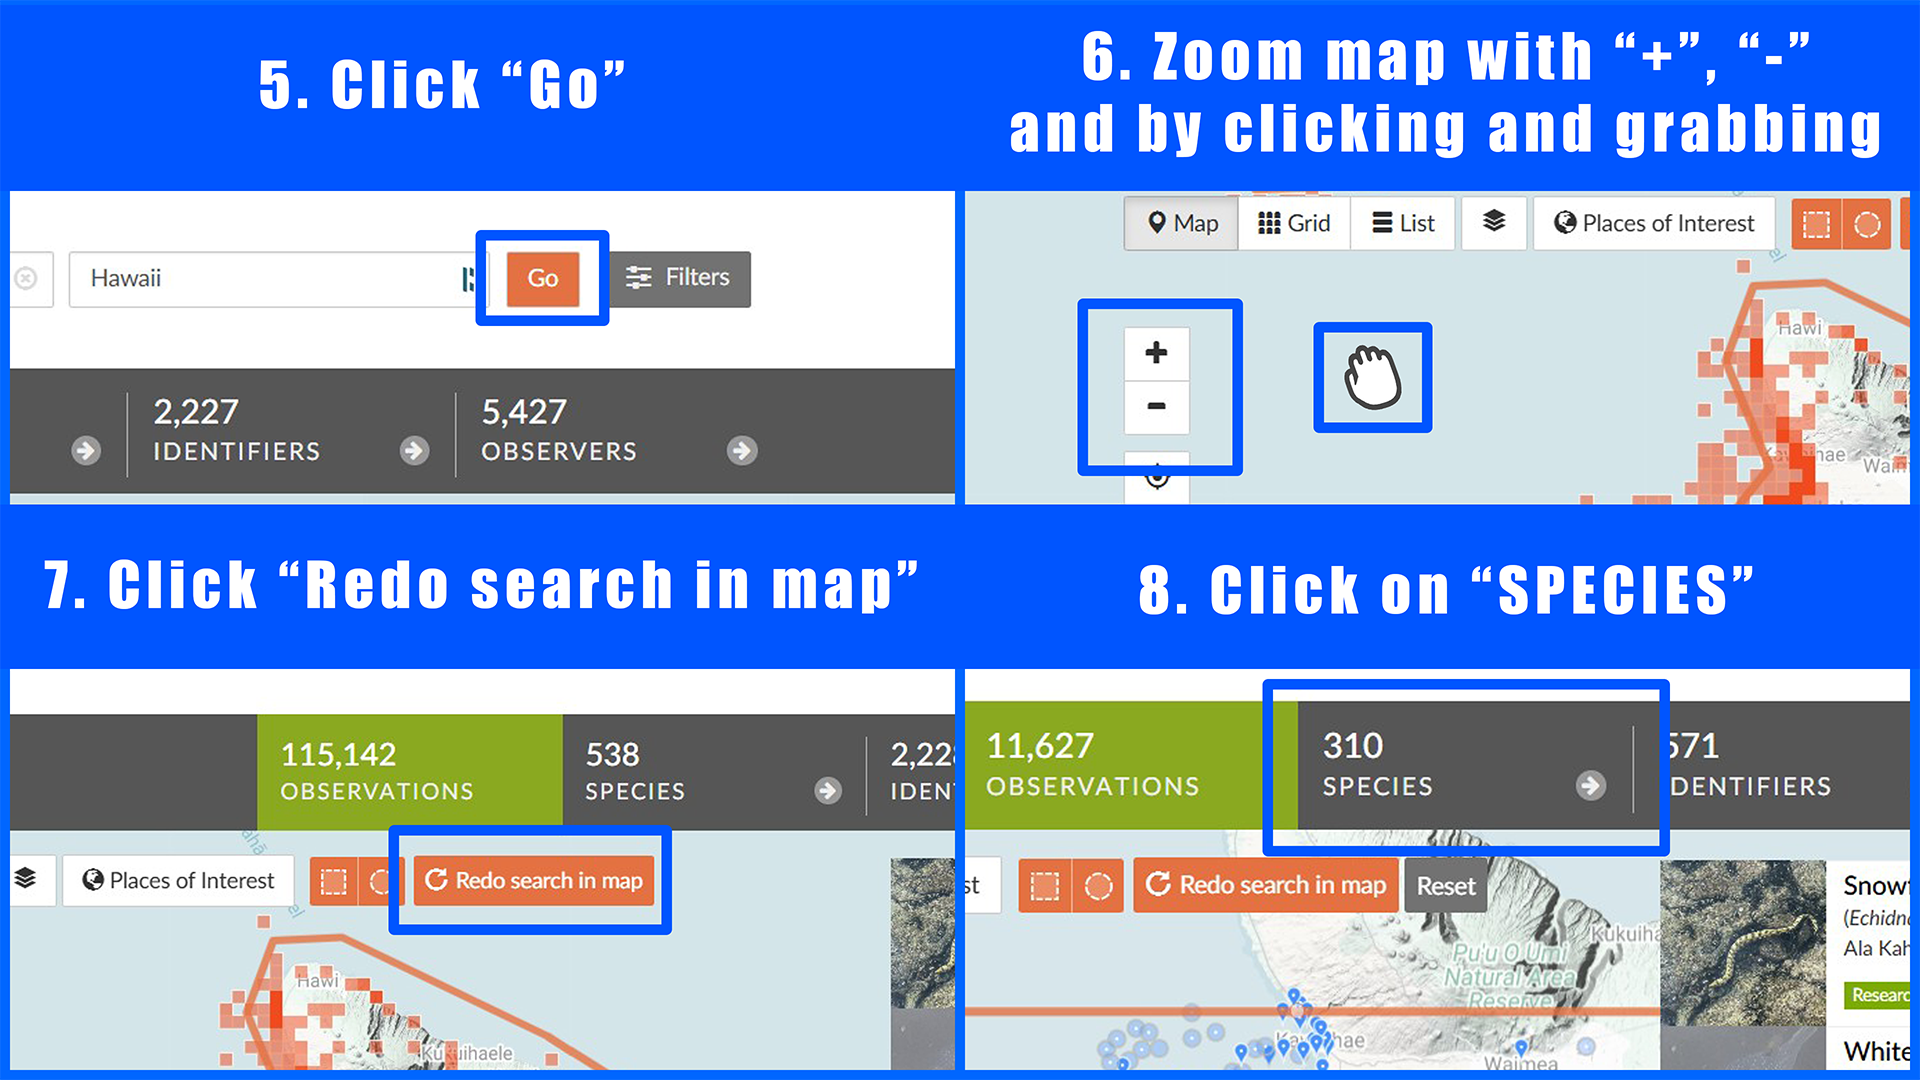
Part E - Steps 5 - 8.
Leave the species page open on iNaturalist for a later step.
You can go ahead and leave the page on iNaturalist open as we will reference it again shortly.
STEP 2 - Catch a fish to ID.
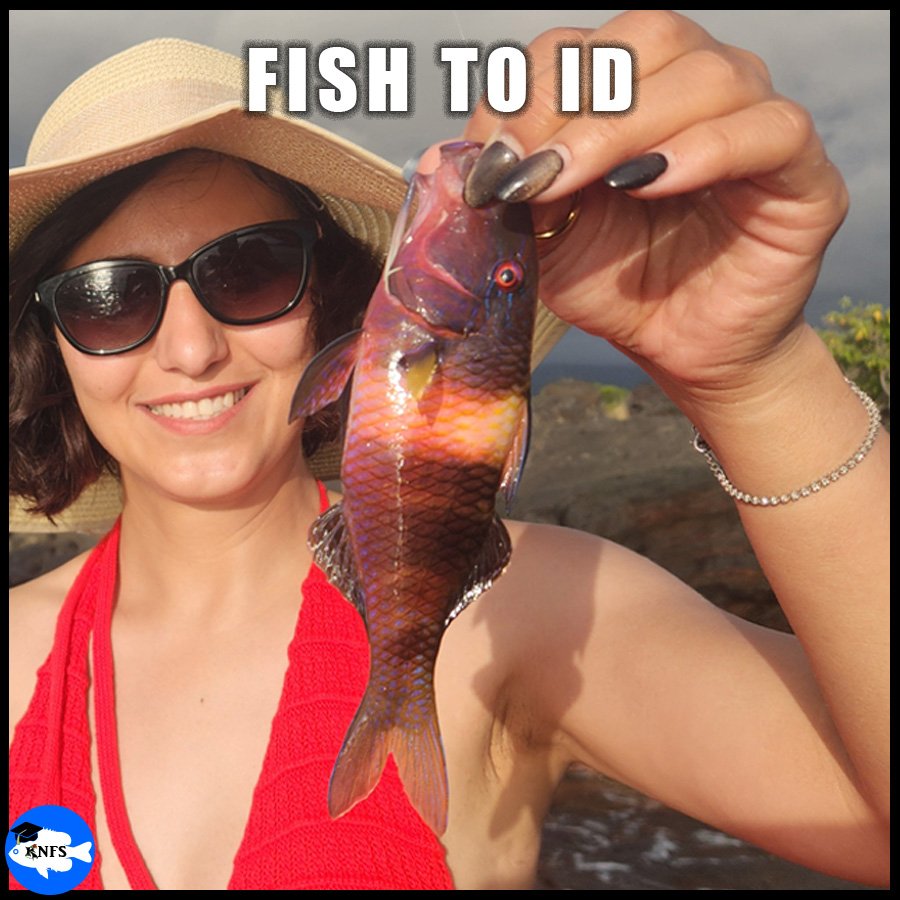
This is a single lateral shot of a fish that needs identification. This was taken with a smartphone camera and reflects the majority of photos anglers use to capture a fish photo.
Asi and I found a nice spot on a rocky shoreline near a harbor that allowed for rod-and-reel fishing. We caught some beautiful specimens of small fishes. (Eventually I’ll get that video produced for the Asi’s Lifelist series on KNFS.)
Let’s go over how we identified one of Asi’s catches, a vibrantly multi-colored fish that was about the size of a water bottle.
Typically, within my identification guides, I tell anglers to get a handful of really good photos of their fish. You can see this in more detail on the common sunfishes id page. The most important photo, and most commonly seen photo, is a lateral shot of the side of the fish. If you can grab a shot of the top and bottom of the fish, that’s great! Getting a closeup shot of the head is even better.
A single photo of a lateral side of the fish is the bare minimum.
Any extra photos, or stills taken from videos, are also helpful.
Let’s work with this casual photo I took of Asi’s fish. A simple photo like the adjacent photo represents what most anglers capture.
Holding Tank: If you plan on identifying a fish on a shoreline/boat and will need some time, either put the fish back into the water while it is still hooked or ensure that you have a holding tank with water that is of similar water quality features (pH, temperature, etc.) as the water you just pulled the fish from.
The fish will likely not do well, and likely die, if you spend more than a few minutes trying to identify a fish while that fish is not in the water.
Ideally, just use the water that you just pulled the fish from! If bringing clear water from home, keep in mind that there are often chemicals in our drinking water that fish do not want to be exposed to (like chloramines); tap water needs to be poured into a container and left exposed to the air for about 24 hours for most of those chemicals to release OR be treated with a water conditioner to remove the chemicals (sold at any pet store.)
STEP 3 - Identify unique features.
Let’s turn the fish sideways just to make it look a bit more like it would if it were in the water. Next, let’s identify some obvious features that we can notice on this fish.
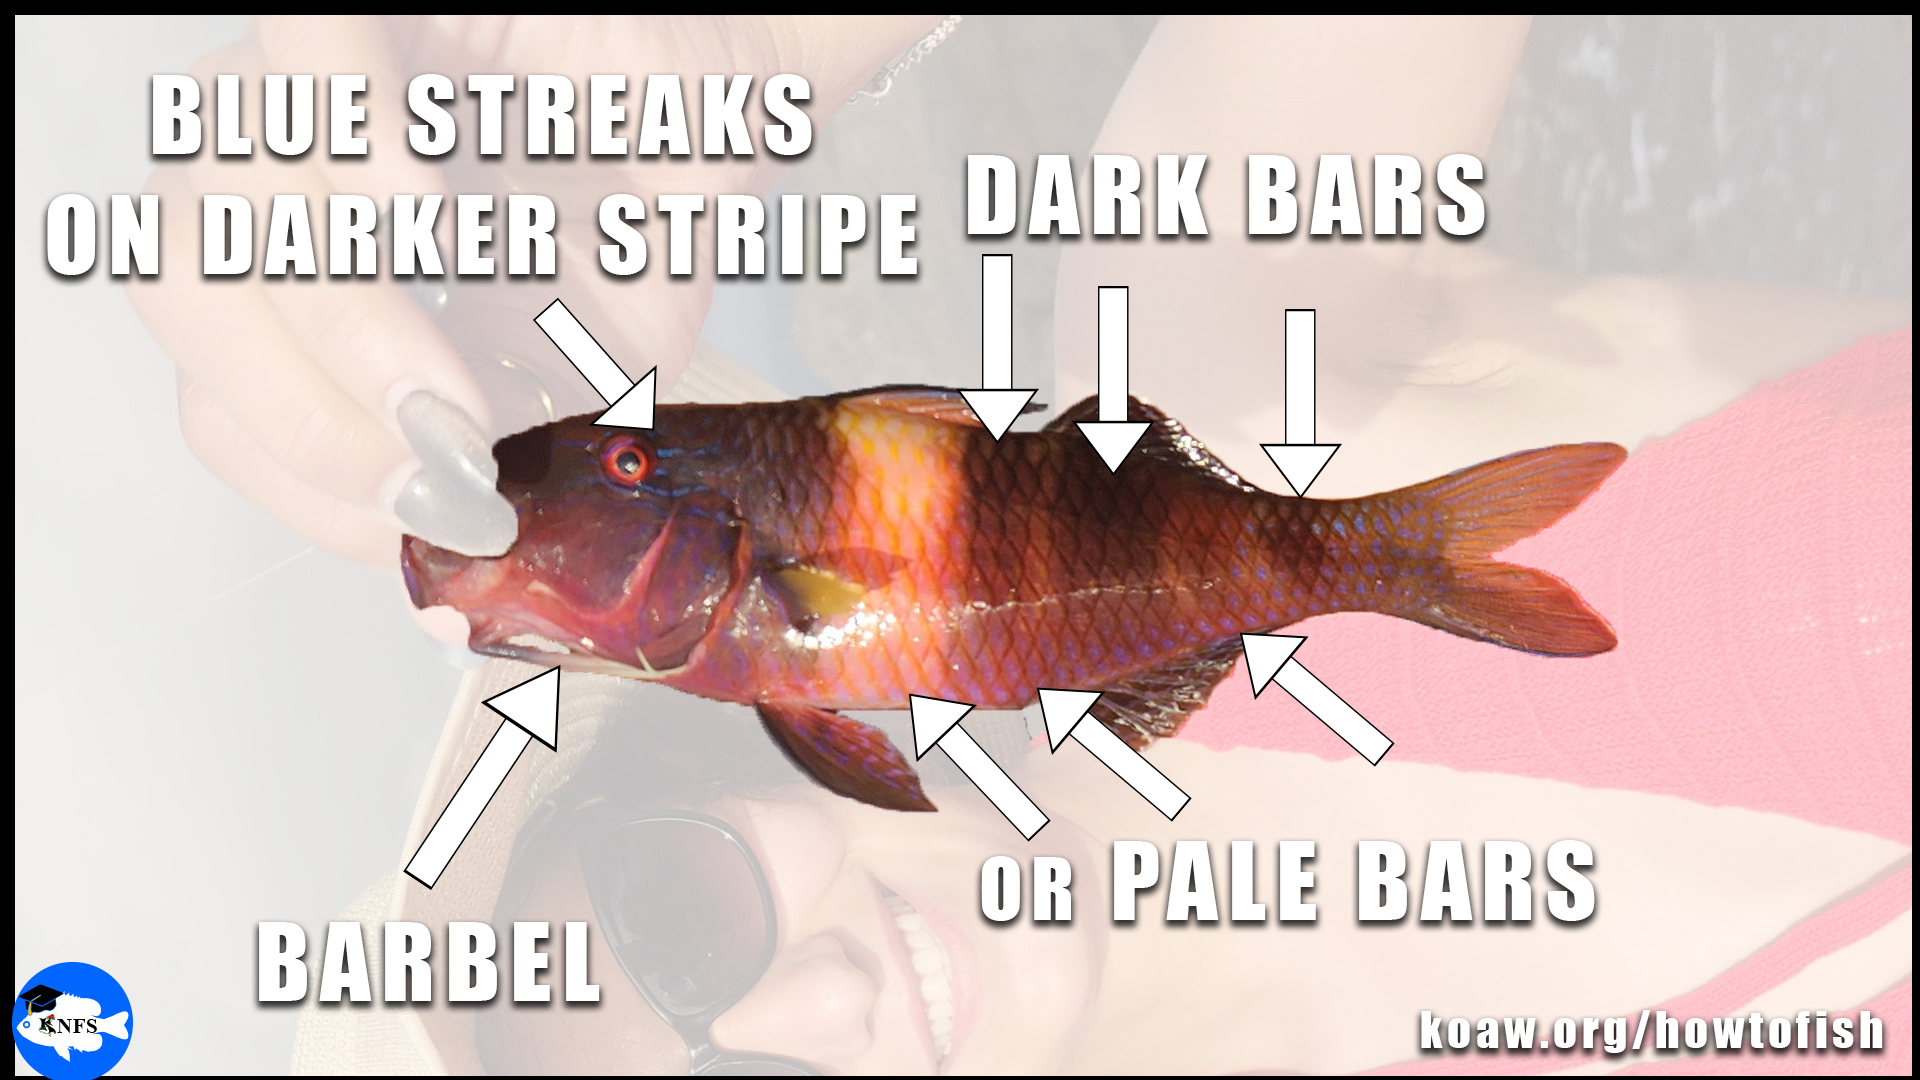
Barbels - This fish has a pair of pale barbels (one on each side). We can only see one barbel in the photo. This is a very helpful characteristic because not too many groups of fishes have such apparent barbels like this.
Barring - We can see that this fish has some irregular vertical bars forming on the side of the body.
Blue Streaking - On the head, we can see some noticeable broken blue streaking patterns on a somewhat darker stripe from the lip through the eye to the gill plate.
Fins - We’ll just notice this fish has two dorsal fins (fins on the top). We’ll notice the shape of the tail fin and the placement of the fins along the body.
Colors - We can see some lovely colors on the body of this fish where an emphasis of the red/magenta contrasts with the paler almost orangish bars. (If you’re colorblind, the contrasts may be useful.) We can see that the fins are mostly the same color where that first dorsal fin has a bit of pale color extending from the bar on the body.
Really, our magical brain is ready to do the play ‘match those features' on iNaturalist.
STEP 4 - Match those features to fish on iNat
Hopefully you left the iNaturalist page open from STEP 1. If not, no worries—just go do that same search from STEP 1 on iNaturalist and focus on the northwest side of Hawaii’s ‘Big Island’. Practice does help navigate the site.
We’re browsing all of the species of ray-finned fishes that are in this area. From those beautiful images of fishes appearing in the region:
Visually scan for fishes with barbels (those whisker-like extensions near the mouth) similar to our specimen
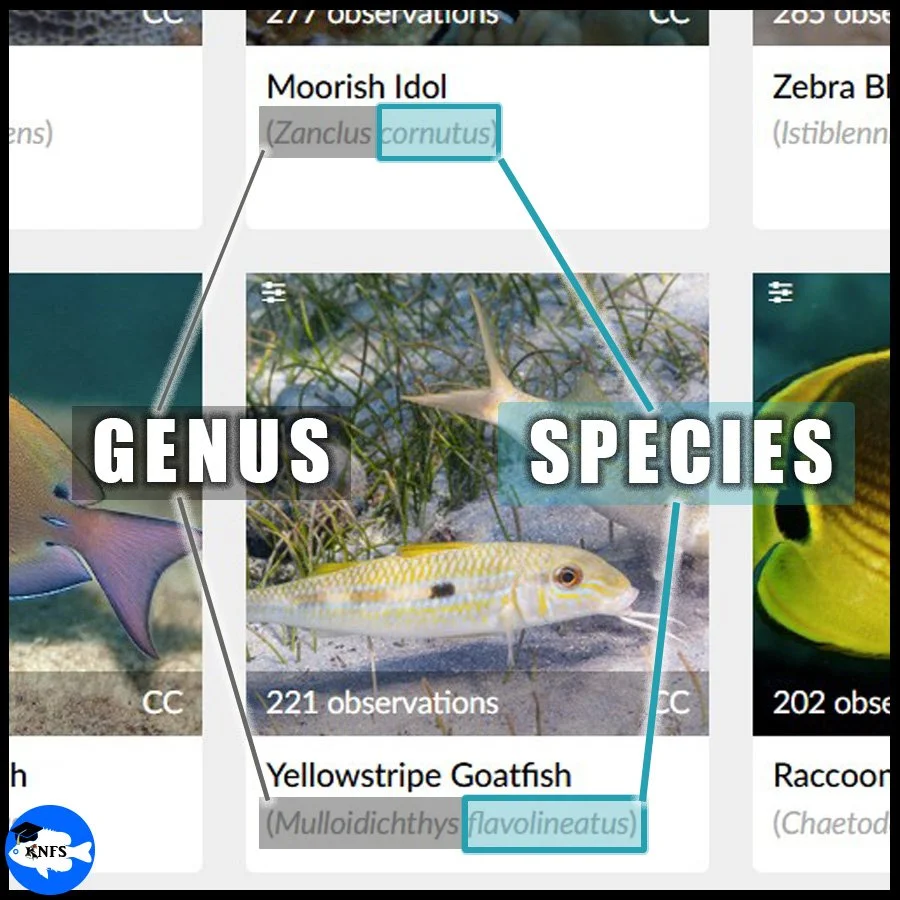
and write down (or memorize) any unique genus names of fishes that have this feature.
The genus name is the first name in the scientific name of fishes. The genus can be thought of as a group of fishes. For one of the most commonly seen fish that appears in this region, Yellow Tang, the scientific name is Zebrasoma flavescens where:
“Zebrasoma” is the genus name
“flavescens” is the specific name
“Yellow Tang” is a common name.
Working with scientific names is a great skill to have because the common names of fishes like “Yellow Tang” will be different in different regions of the world. One fish may have 100+ common names!
There is only one valid scientific name for any species across the world.
Genera (plural of genus) with barbels: Mulloidichthys & Parupeneus
Click to enlarge. Shows the species within the two genera that have barbels in the region of search.
I found two genera of goatfishes that really have barbels like our specimen Mulloidichthys & Parupeneus. When Asi had caught the fish, I knew that she had caught a goatfish because I had familiarized myself with the regulations beforehand (and I’ve interacted with goatfishes before). I’ll admit though, I could not confidently say what species she had caught in those moments.
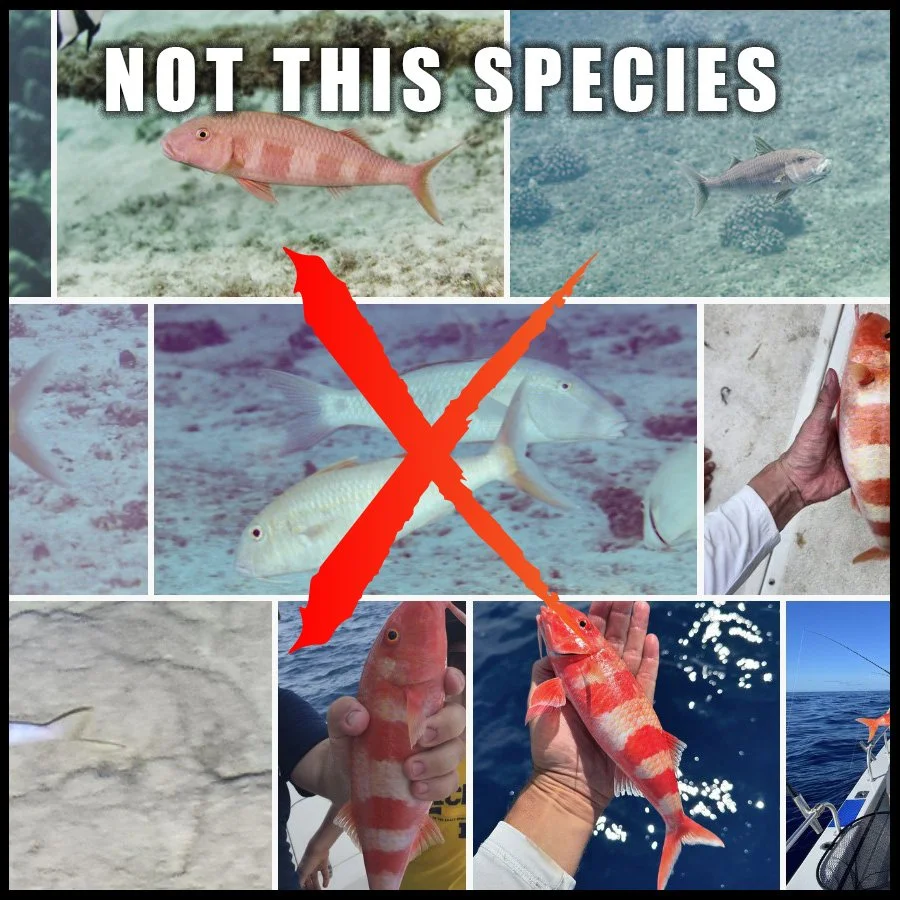
Images of Orange Goatfish (Mulloidichthys pfluegeri) from iNaturalist. Clearly we see this is not our fish.
With two potential groups of fishes, let’s browse them:
Type “Mulloidichthys” into the “Species" box and hit enter. (Make sure not to select a species that pops up but rather the genus.) Also make sure you are still looking in that region of Hawaii that you found before.
Click on “SPECIES” to see the three species of this genus that have been observed in this area.
We can see that two of the species have horizontal stripes and our fish does not. Now, that doesn’t necessarily mean our fish is not one of those species, because fish can flare up and down their patterning, especially after being caught. However, both of these species with horizontal bars also have white bodies. We will exclude these species from consideration.
That final species deserves a closer look. In a new tab, click “Orange Goatfish” under the image.
Click “View more ->” to see more photos of this species. We can see that not many photos appear, so this is a rare species to encounter. We can also see that the overall appearance of patterning and color on the body doesn’t match our specimen.
We are going to exclude the genus Mulloidichthys from consideration.
With the main tab with the Hawaii region selected, type “Parupeneus” into the “Species" box and hit enter.
Click on “SPECIES” to see the species of this genus that have been observed in this area.
Five species have been observed in this area from this genus. Browse each species and determine what features on our fish resemble features on those species.
It appears that the two most commonly encountered species of Parupeneus look very similar to our specimen.
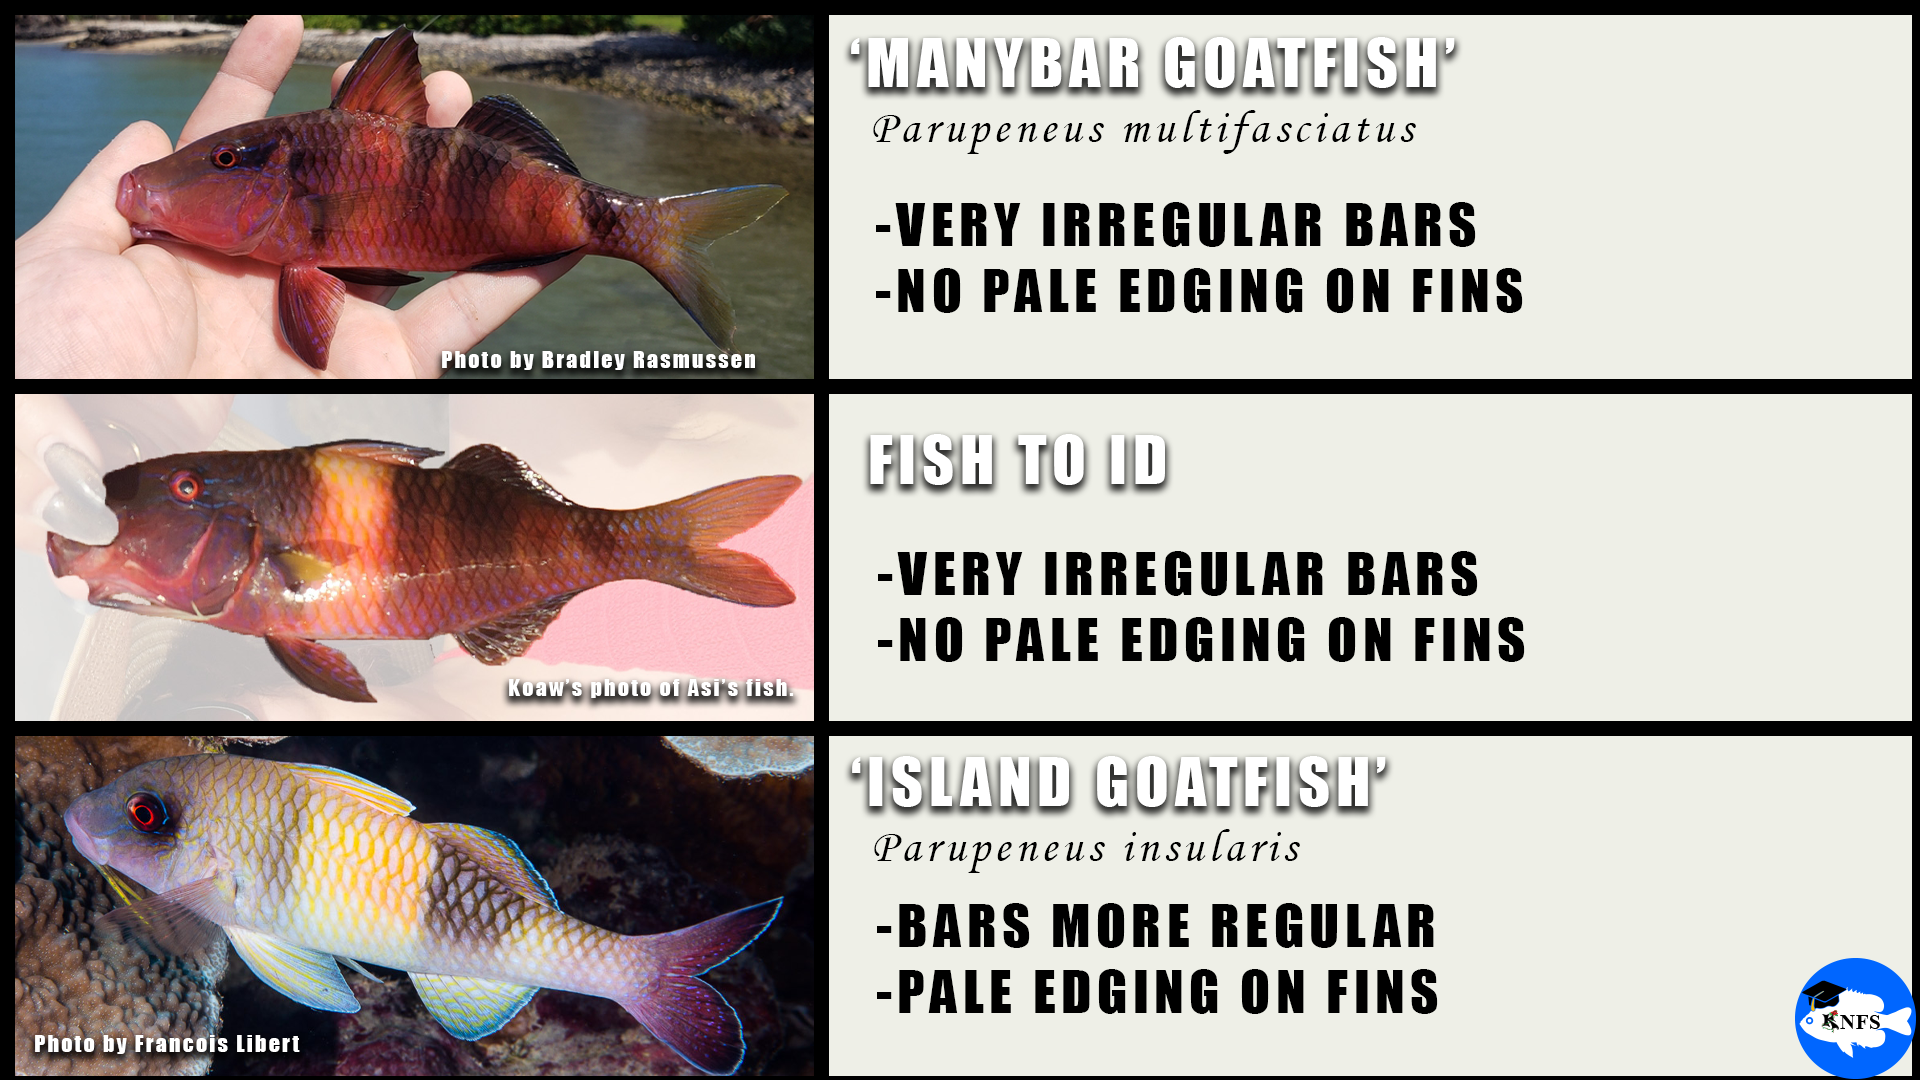
Comparison image of 3 specimens:
Two species to pick from:
Now we have two potential species that could match our specimen: Parupeneus insularis (Island Goatfish) and Parupeneus multifasciatus (Manybar Goatfish)
Click “Parupeneus insularis” then click “View more ->”. Browse specimen photos and compare them to our specimen.
Then do the same with Parupeneus multifasciatus.
If browsing images in the main observations section, only examine photos that have a green “Research Grade” label, as these are most likely to be correct identifications of that observation.
There are some apparent differences between the majority of specimens when comparing the two species:
P. multifasciatus seems to have much more irregular coloration, spacing, and sizing of the vertical bars on the body compared to P. insularis.
Both species appear to have that blue streaking on the head, but P. multifasciatus tends to almost have a darker band behind the eye that may be extending towards the lip.
P. insularis tends to have a deeper body, or one that looks taller at the thickest portion, compared to P. multifasciatus.
P. insularis most often has a thin layer of pale edging on the outermost portion of the fins compared to P. multifasciatus that does not seem to have this contrasting edging.
After these comparisons, and without referencing any text in any guides, we can make a guess as to what fish Asi caught. Granted, we’d make a better guess with the textual references from guidebooks and/or other publications that have studied these fishes.
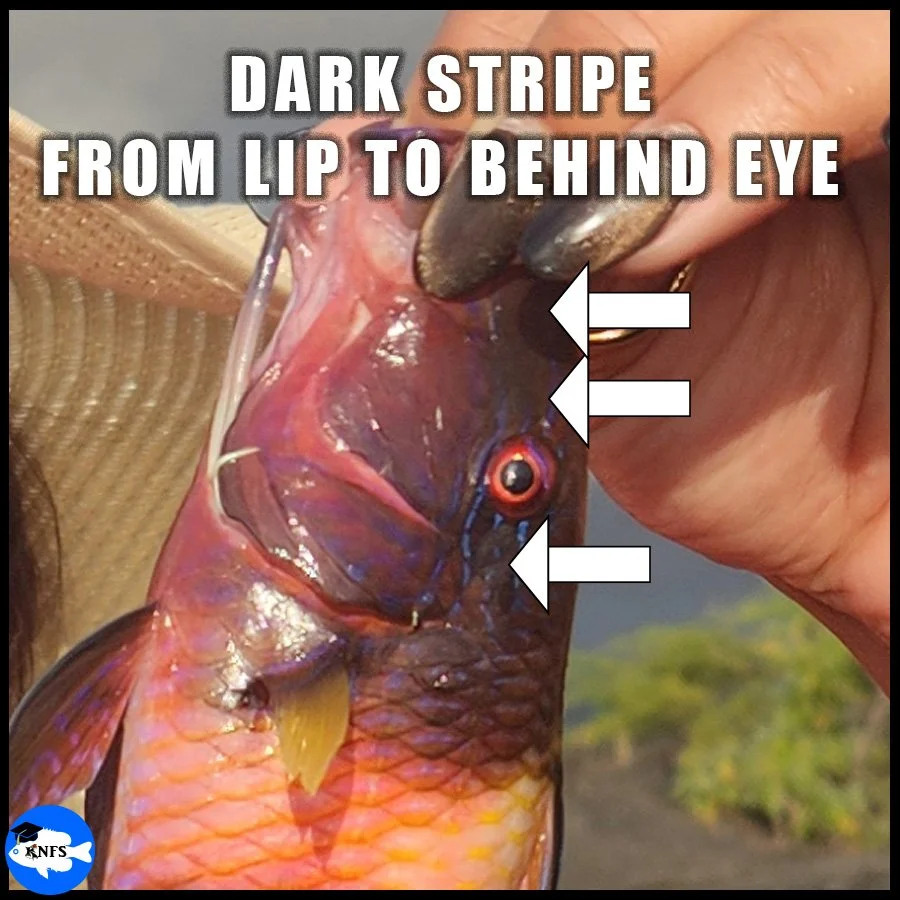
Asi’s fish has a dark stripe on an already dark head. This is difficult to see because of the light angle, but it is there.
We believe Asi caught a Moano or Manybar Goatfish (Parupeneus multifasciatus) because:
Asi’s fish does not have any apparent pale edging on the outside of its fins as is seen on almost all specimens of the other goatfish species.
Asi’s fish has very irregular patterning of bars and coloration, of which, is not seen as often on the other goatfish species.
Asi’s fish has a dark stripe on the head that appears to start near the lip and go through the eye. This one is hard to see because the photo is not great and the fish is out-of-water.
Asi’s fish maintains patterning and coloration very similar to a number of specimens of Manybar Goatfish seen in that region.
(THE EXTRA) STEP 5 - Confirm with other sources
Ideally, we don’t want to get overconfident in our magic brain as we say, “It looks like this fish and not these other fishes!” Even if most of the time our magic brain identification process works.
We also don’t want to be overconfident with iNaturalist identifications, even those labeled as “Research Grade”, as sometimes there are errors, or misidentifications.
To be extra sure, that’s when we want to reference other materials.
https://fishbase.org/ is a good free-to-use reference that will often have some useful information if you browse by species. At the very least, the references on this site could lead you to a useful reference.
Local guidebooks that can be purchased will be very helpful as they should state what key features to identify to determine your fish species from other similar species.
Go back and reference the state’s fishes identification information. Some state’s do a better job than others, so there is no harm using another state’s online information.
Load up your photo of a fish into iNaturalist. I show how to do this in more detail in another guide here.
Go to of Google’s AI powered search engine (the free version):
type, “What are the appearance differences between insertfish1 and insertfish2?”
I’d say the information that pops up will most likely be helpful. Though as a scientist, I’m trained to doubt everything constantly; I always check the references and then check what references are being referenced and so on and so forth until I find the actual publication from where some researcher(s) worked on that species. Even then, I will check the authenticity and trustworthiness of that publication. This process is much effort and will often dead-end someone without access to expensive journal databases.
Go to Google Scholar - This will bring up journal articles. Type in the species name + “morphology” or “characteristics” or “features”. However, many articles will not be accessible without access to those journals. Sometimes you can get lucky and find a free read that has some identification help.