
A nifty, high speed video of the ENTIRE CREATION of a stained glass clownfish.
By Koaw - January, 2018
I'm giving this little guy away! The official video and giveaway starts Monday, January 8th, 2018 and is open for FREE ENTRY until January 22nd. I will put the links you need to enter right here and on my YouTube channel when that time comes!

Creating stained glass artwork is an enjoyable hobby. This brief article will partner with my YouTube video to give you the step-by-step on how I made this cute little fish.
Keep in mind, if you are a first timer to stained glass creations, I highly suggest finding a local glass shop or a crafts center that hosts tutorial classes about making the glass. It’s easier and cheaper to first go try out the process with their equipment. If you are hooked after you have created your first art piece, then it’s time to go get yourself some supplies! (This tutorial won’t give you everything you need to know about this cool hobby – but it will give you a good deal of easy, understandable information.
Please be careful when doing this hobby. There are many dangers and it is up to you to take the necessary precautions. Always follow safety protocols listed on your grinder, chemicals, and cutting tools. First timers should always seek professional help prior to handling any of the equipment.
Disclaimer: I’ve listed the equipment that I use (or similar versions) that are sold on Amazon. If you happen to click on an item and make a purchase from Amazon within that window then I’ll receive a small finder’s fee – I’ll also be sending you positive vibes of thanks!

1. Draw the Template (x2)
This first drawing step is actually very important because you will need to change your image to correspond with how you will cut the glass. What do I mean by this?
Certain shapes are very hard to cut. Deep concave pieces and thin slices are usually a no-no. For newbies, learning how to understand fracture lines is probably the hardest part of the whole process.
It’s also important to consider the weight distribution and support structure of your project. Since my fish is rather small, I don’t need to worry too much about poor weight distribution that could lead to it falling apart.
My Fish: I’m not a skilled drawer so I traced over a fish image that I previously created on my computer. If you watch the video, you’ll notice that I tweaked the drawing away from the exact image of the fish. Why? Just what I talked about above – certain shapes are very hard or near impossible to create.
If you want to use my fish as a template, simply save the .png image (above) of my fish and print it!
Make sure to create a copy of your template! (Either by tracing or a scan/print).

2. Trace the Template onto Mylar Paper
This step is fairly easy. Just trace over your template with a thicker pen. Don’t destroy your template.

3. Label the Mylar Pieces
This is where the pieces get a brief label. I label my pieces so that I know three key things:
- The direction which is up and where I want the glass to ‘flow’.
- The color that piece will be.
- The number of that piece.
After you have these labeled on the mylar, I suggest labeling all the informatin on one of your templates.
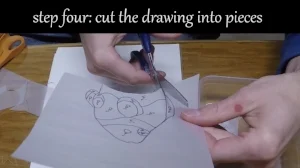
4. Cut the Drawing into Pieces (this is better with shearing scissors)

Exact ones I use on Amazon
Cut the pieces while following your drawing. Shearing scissors will be cutting a bit extra around the edges which will help in a later step.

5. Glue the Pieces to Glass
This is where a lot of the artwork gets enhanced. Choose your glass wisely, remembering that certain sides of the glass are easier to make cuts.
I use a simple glue-stick to have my pieces adhere to the glass.

6. Cut the Glass
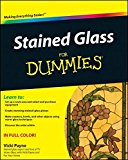
This is where experience comes into play - there are a lot of little things that can go wrong when cutting. I’ve suggested a book or two that will help newbies out with this. Why get a book? Well, even if you have taken a class or two, it's always nice to have the need-to-know info right at your work area. Take it from me, BREAKING GLASS IS EXPENSIVE! It will be cheaper to buy a good reference and study it for a bit instead of making costly mistakes over and over.
A few key things to remember:
- Heat the glass a bit. Warm glass always cuts better – but don’t get it too hot or it will fracture!
- Try to avoid going over cuts in the glass that have already been made by your cutting tool as this dulls the blade.
Keep a clean work station. Glass will scratch glass!
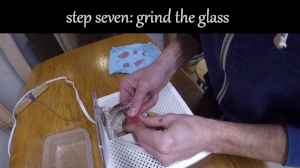
7. Grind the Glass
Grinding is also a step that takes a bit of skill and experience. Remember to always do a go-around of the entire glass piece on the grinder to remove sharp edges.

8. Check What You Have
This is the time to place your pieces on your copy template and make sure everything is evening up nicely. If it’s not, then adjust or remake pieces as necessary.

9. Clean the Glass
Soaking the glass to remove the glue and excess glass powder is a good start. A warm tub of water with a bit of dish soap does well for this stage. I use a wire brush to scrape the edges to remove any last bits of powder.

10. Apply the Metallic-Coated Tape
- Make sure the glass is clean and dry before applying the tape.
- Keep the tape even on both sides.
- Use your fingernail or a wooden tool to press the tape firmly to the glass.
I have used a copper-backed tape to place around the edges of each glass piece. Also, I decided to bail on placing a small black piece around the eye. Instead, I simply placed more copper tape on the white piece and carved out a half-circle. When the solder is on that tape with the black patina, it will look like a nice dark pupil.

11. Prepare the Glass for Soldering

Place the glass on your template. Using a flat surface that can be tacked into is advised. Make sure the artwork is flat, firm, and clean. Then apply flux as needed to the exposed metallic surface.
(NOTE: If this piece is going to hang then it is a good idea to have mounting brackets soldered to your piece!)

12. Tack the Glass
Tacking, or soldering small spots along the glass, is done on both sides.

13. Solder the Glass

Solder the glass! This is another step that takes a bit of experience. My best advice for this step is to never let one area get too hot. Move around the glass and use a fan to keep the smoke out of your face.

14. Clean the Glass
Again, clean the glass. This time use a flux neutralizing agent. A wire brush is still fine to use at this stage.

15. Apply the Patina (optional)
I have used a black patina for this fish. Wear protective gloves – this stuff is nasty. I use Q-Tips to gently apply the patina. Dab off any excess patina with a rag and rinse the piece in water.

16. Apply wax (optional)
The wax gives a nice polish and helps to remove any remaining patina that did not oxidize the metal.

17. Buff Clean
Just buff the glass with a clean rag and use a soft but firm brush (NOT WIRE - a toothbrush works well) to remove excess wax from corners and cracks.
That's it! All that's left is to hang it!

Thanks for checking out this page at Koaw.org