By Koaw - November, 2020
STEP 3: No fancy camera? No problem. This page will cover how to take a few quick photographs of your fish that will capture the essential features needed to help with identification. A few good photographs will help you identify your fish as well as help other people identify your fish. (We’ll get to how others may help you identify your fish in Step 6.)
Photographing in a glass tank provides better photos. The fish is more likely to extend all of its fins when gently pressed against the tank wall.
WHAT YOU NEED FOR PHOTOGRAPHS:
A camera.
A fish.
Although a DSLR camera or similar is always best to use for capturing photographs, not all of us have a fancy camera and that’s fine. We live in a unique age where most people already have a decent camera on their smartphone. Your smartphone’s camera will be absolutely fine for photographs. I’ll show you the photos I’ve taken with my smartphone that work for identification purposes.
I’m also going to assume that you are not walking around with a three-gallon glass tank like I tend to do. So although some great photos may be taken while the fish is in clear water in a glass tank (acrylic tanks scratch too easily), photos outside tanks can be adequate as well. The following discusses how to take photos without a tank.
QUICK TIPS FOR HANDLING SUNFISHES
A fish caught in Wisconsin in sleeting weather. (Oh yes, it was cold!)
Avoid handling a fish with dry hands, especially if you plan on returning a fish to the water. Sunfishes, like most fishes, have a protective mucus membrane all over the dermal layers, or skin. Dry hands are often abrasive and absorbent that then remove the fish’s protective membrane.
Watch out for the spines! Any sunfish will have very sharp spines on the dorsal side (2d dorsal fin) and ventral side (pelvic fins and anal fin) which most definitely can pierce your skin (trust me I know!) It’s important to hold the fish firm enough so that it cannot flop away but gently enough so as not to hurt the fish.
Place the fish on a flat and wet surface if you plan on setting your fish down for a photo. Just like was mentioned with the dry hands, the fish has a mucus membrane that will rub off on dry surfaces. Also be mindful not to set your fish down on an extremely hot or cold surface—ouch!
Keep it under 1-2 minutes. It’s really best not to keep the fish out the water for more than a minute, two minutes max. Yes, that’s not much time to take a bunch of photos. The first photo is by far the most important and should be prioritized. If a stubborn fish just isn’t cooperating then get that first lateral shot and let it go.
THREE PHOTOS TO TAKE
Let’s cover THREE PHOTOS to take where the first one is the most important and more than likely sufficient enough for an identification. For all photos, try to avoid uneven lighting (like shadows), blurriness from poor focusing and covering any part of the fish with your hands and/or debris.
I’ll quickly discuss how to capture these photos: 1) A complete lateral view. 2) An above head shot, or dorsoanterior view. 3) A shot of the gill rakers.
PHOTO ONE: THE COMPLETE LATERAL VIEW
This shot would be ideal if the pectoral fin were flatter on the body. But for a non-tank shot it’s a great photo; all the fins are splayed and the entire lateral side is in focus. The day’s light really helped bring out this breeding male’s bright features.
If you’re in a rush and only want to take one photograph then this is the one. The lateral view is a view from the side of either the left or right side of the fish. This shot is what you normally see in guide books. We biologists prefer taking photos of the left side of a fish to place in our studies/guides, though it would be great to capture both sides of the fish as there are often differences on each side. Differences such as pectoral ray counts, presence or absence of colors on the opercular flap, different markings along the body etc..
TIP: The entire side of the fish should be in focus; that means the lens on your camera is parallel to the side of the fish.
IN YOUR HAND: This shot, for most sunfishes, can be easily captured with one hand holding the fish and the other on the camera. If the fish is small enough then you can create a cradle with your palm and use one hand to extend the fins while the other operates the camera. Use your thumb to gently press the front-most or tallest dorsal spine towards the head of the fish; this lifts both the spinous and soft-rayed dorsal fins, allowing them to be seen. (Yes, the spine is sharp—so you’ll have to figure out the appropriate pressure.) Try to have the anal fin, caudal fin, and pelvic fins outstretched and exposed as much as possible; this helps with fin counts. Also try to have the pectoral fin flat on the fish’s side and spread as much as possible.

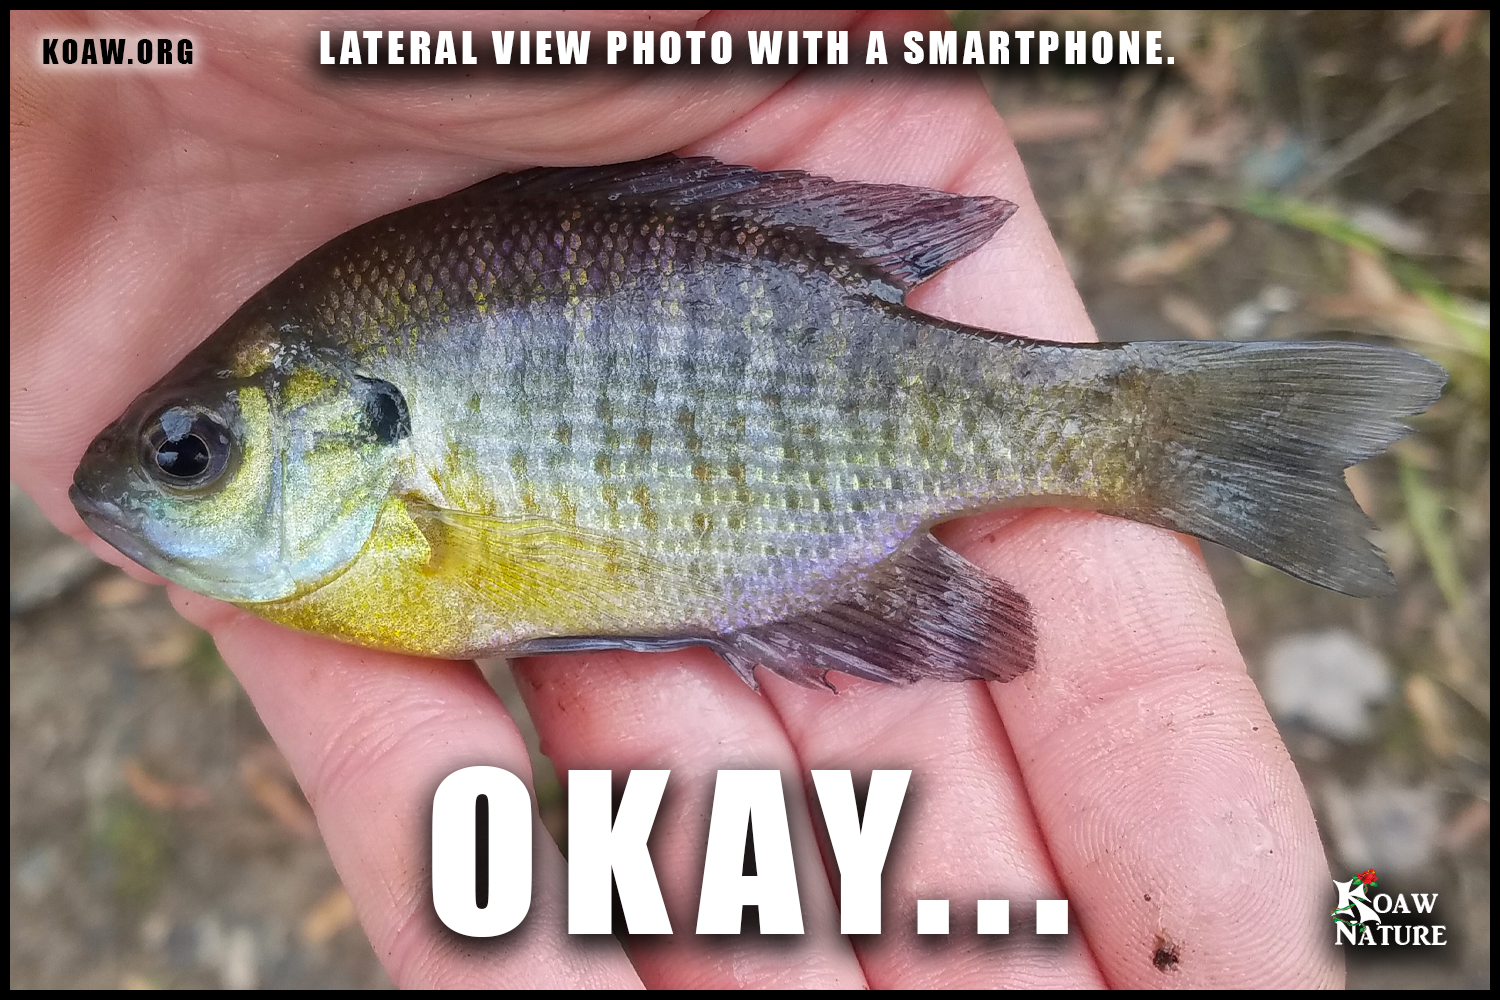

Above are three photos I captured with my smartphone of this bluegill (L. macrochirus). The first image clearly has my hand obstructing too much of the fish. The second image is acceptable but the dorsal fins should really be somewhat erected. The third image is good for a lateral shot; the spines and rays may be counted in the pectoral fin, dorsal fins and anal fin. Plus that dark blotch is visible in the second dorsal fin—an important feature to examine on a few species! Perfection isn’t the goal here. It’s about getting the best image possible in the fastest time. Most fish will not cooperate for a photo!
A lateral view taken with a smartphone’s camera on a laminated piece of white paper. Remember, perfection isn’t the goal. A shot like this will suffice.
ON A FLAT SURFACE: Better contrast comes from setting a fish down on a pale, one-colored surface. Also bigger specimens often need to be placed down flat because holding bigger fish requires collapsing the fins which is not helpful for photo quality. It’s best to set the fish down on a wet and flat surface. I carry around a laminated piece of paper with measurement markings that I created to quickly photograph bird feathers in the field; it also works well for fish photos.
Again, if the fins aren’t somewhat erect then try to lift the tallest dorsal spine forward so that both the spinous and soft-rayed dorsal fins are extended. (This is very hard to do with the fish outside the tank.)
A quality lateral view shot provides lots of useful information.
PHOTO TWO: HEAD SHOT! (DORSOANTERIOR VIEW)
A photograph of the top of the head that includes the upper lip may be a beneficial photo. It’s fine to hold the fish with collapsed fins for this photograph. From this photo we can gather further information about the mouth size, the coloration on the upper lip and the structure of pores atop the head.
PHOTO THREE: GILL RAKERS
Looking at the rakers of a redspotted sunfish (L. miniatus).
You remember the gill rakers right? We went over them in STEP 1! The gill rakers on the first gill arch are seen by lifting up the gill plate. Grab a shot of the longest rakers you can on that first gill arch. Getting a good shot of the rakers may be incredibly useful in lepomid identification, especially if hybrids are involved.
I wish I could tell you that this is an easy photograph to capture…but it’s not. It takes some practice and experience.
Here’s the main problem: If you are using an autofocus feature then the camera will more than likely not be able to focus on the rakers. The autofocus tends to focus on your thumb and the edge of the gill plate. What does that mean? You’ll take a semi-blurry shot of the rakers or you’ll have to set a manual focus. Most smartphones don’t have a manual focus feature. As long as your photo can make out the general length vs. height of the longest rakers you can photograph then that’s all you need.
This is how I manually set the focus for raker shots in the field with my DSLR using a standard 55mm lens.
Keep the autofocus on.
Get the lens as close to the fish as you can while still keeping a non-blurry focus.
Once that focus is set, switch the lens to manual focus. This should preserve that close-up focus setting.
Lift the gill plate and get a thumb wedged under the gill plate. Try to make sure the rakers aren’t mushed together.
Using your viewfinder, get as close to the longest rakers you can see until they are in focus.
Take a few photos.
Check if you got a decent photo. If not, give it one more quick try.
TIP: You’re goal is to get a shot of the longest rakers visible on the first gill arch. The first gill arch is the closest to the gill plate. Inevitably your thumb will block some of the rakers—that’s okay! Just try to capture the longest rakers possible, of which, will be more central/distal on that at gill arch.
EXTRA PHOTOS TO TAKE
More photos are always best. Try getting these shots to expand your identification possibilities.

LATERAL HEAD SHOT
A close-up lateral shot of the head including the mouth, cheek and opercular flap is always beneficial.

VENTRAL VIEW
A shot of the urogenital opening which is right by the anus on the underside of the fish. This will possibly help determine if you have a male or female.

LATERAL LINE
A close-up of the lateral line. For a couple of species, like the dollar sunfish (L. marginatus) and the bantam sunfish (L. symmetricus) a shot of the lateral line, especially on the back half of the fish, can help nail-down an ID.
You have your photos and I bet you already have a good idea of what your species is. The STEP 4 awaits!